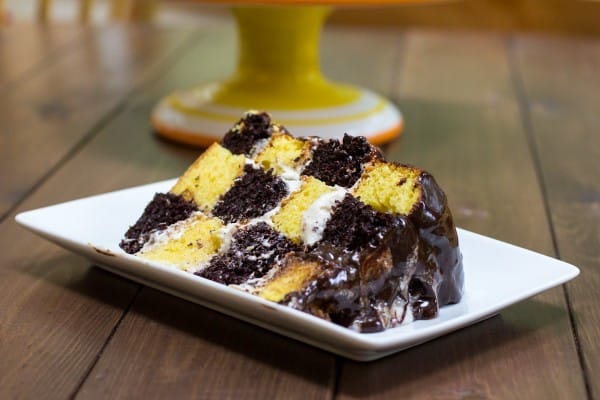
Checkerboard Marble Cake is such a cute and fun cake to make for someone who, like me, cannot decide between chocolate and vanilla.


Checkerboard Marble Cake
Last weekend I got the baking bug, and I spent the day in the kitchen baking and cooking.
I’ve been dying to try one of these checkerboard cakes since I first saw the videos circulating around Facebook. I’m not sure who originated this technique – but my hat is totally off to you. It is SO COOL.

My favorite mother-in-law has been hinting around on Facebook and at family gatherings a little bit lately and letting me know a bit too much time has passed since I made her favorite cake – the Hostess Cake, and I haven’t posted any desserts around here since my Meyer Lemon-Orange Meringue Pie.
It was time.
And so the checkerboard marble cake was born!


The filling is a sweet marshmallow cream mixture that is a great copycat of the Hostess Cupcake filling, and the ganache on this is so rich and decadent.
Love chocolate? Try these Chocolate Pudding Brownies!
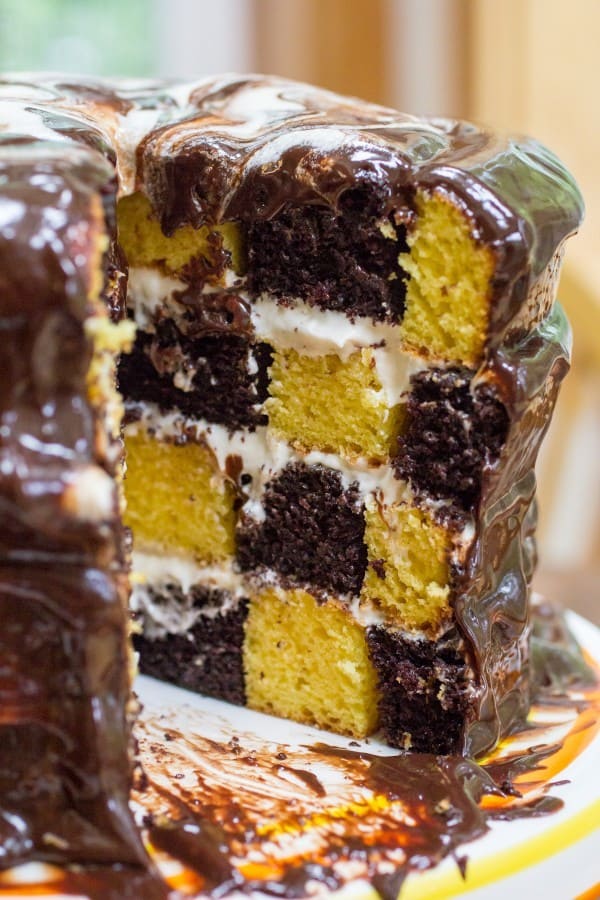

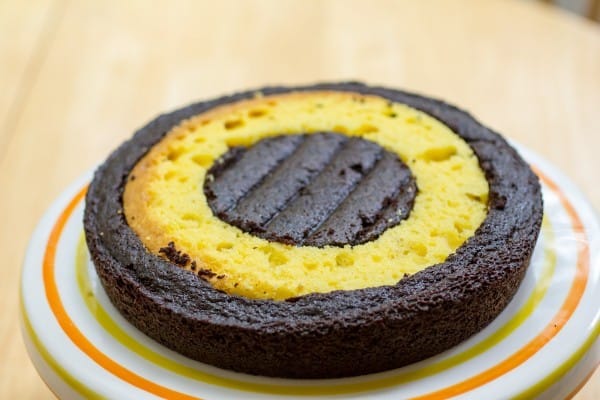
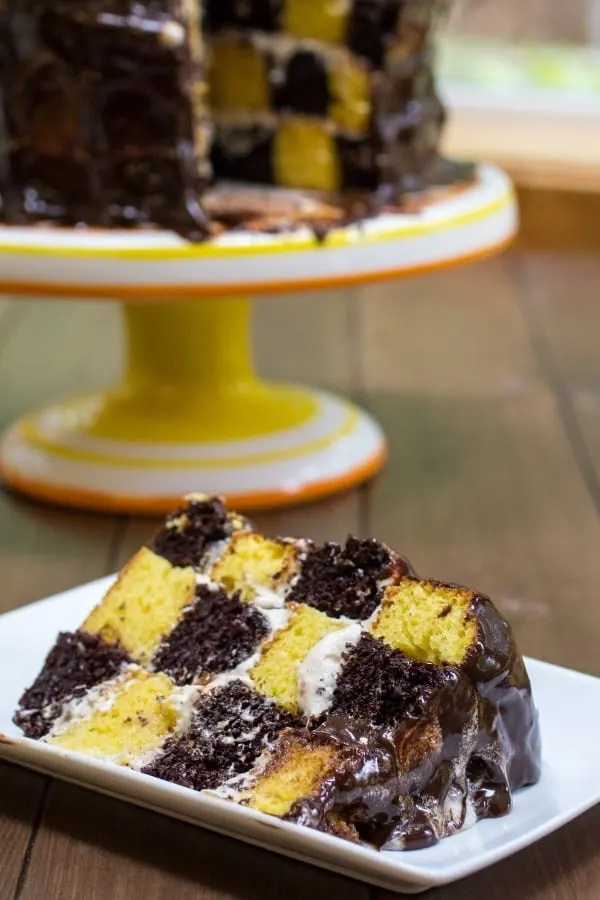
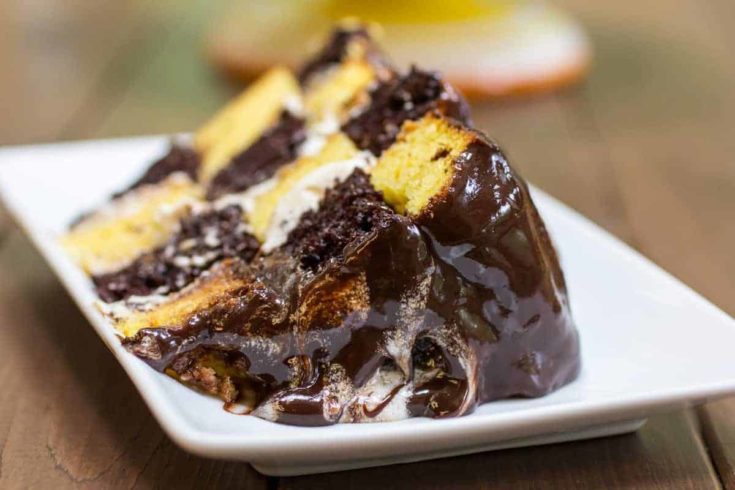
The checkerboard pattern is way easier to pull off than it looks. It’s just cake rounds with circles cut out and put back together in alternating colors and then stacked.

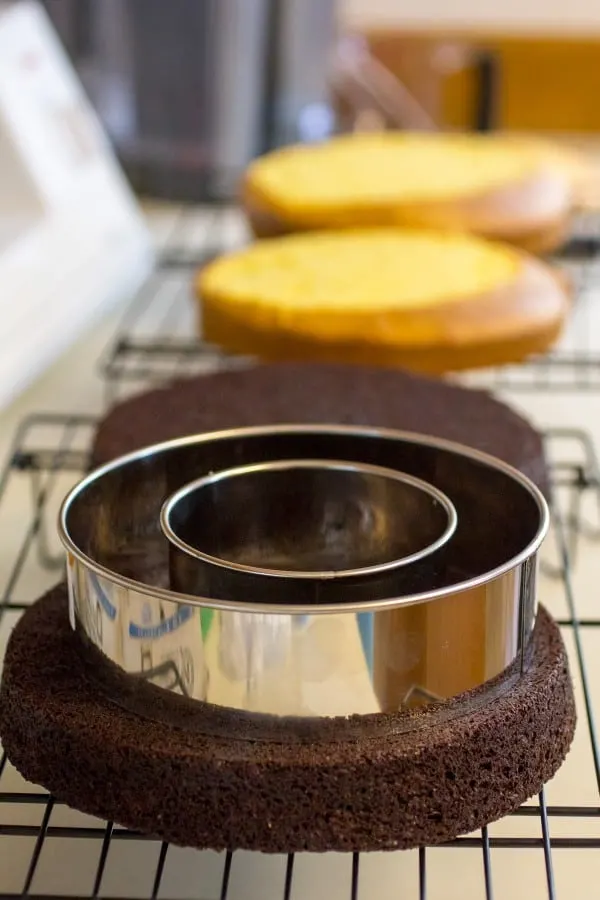
I ordered my cutters from Amazon. Here’s a couple that you can use with your 8-inch cake pans. This 6 inch round cutter is great, and this 3.5 inch was perfect for the middle cut. This should also work with a 9-inch cake pan, but I haven’t personally tried it yet.

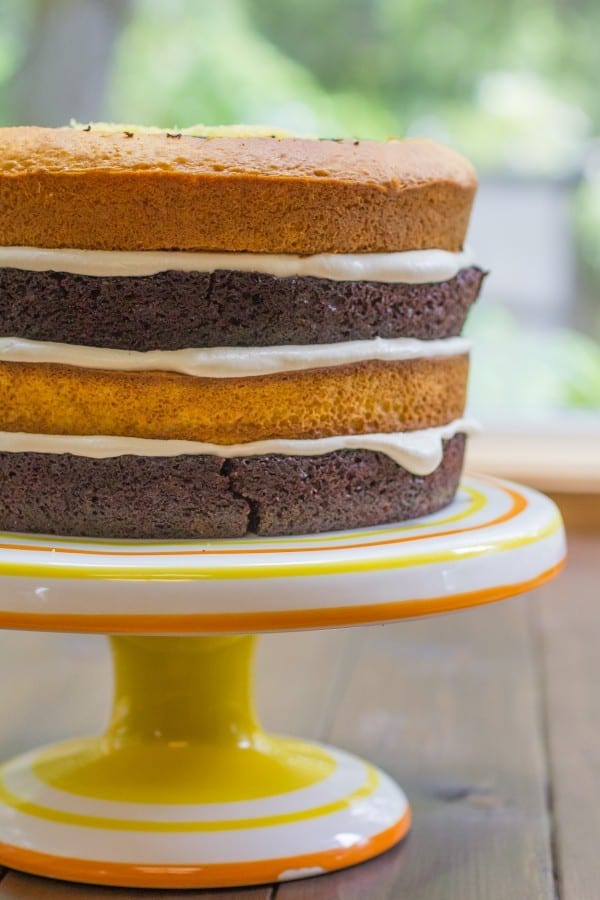
Then it’s just to the baking and cooling and assembling! It goes really quickly. Even when you do have little fingers trying to get a taste!
Don’t forget to frost on the inside of the circles, carefully, so that you don’t cause a bunch of crumbs. I would just pipe a good-sized line through the circle and then gently start the nesting.


Just keep stacking – just keep stacking.
(We’ve been watching a lot of Disney around here lately! Can you tell?)
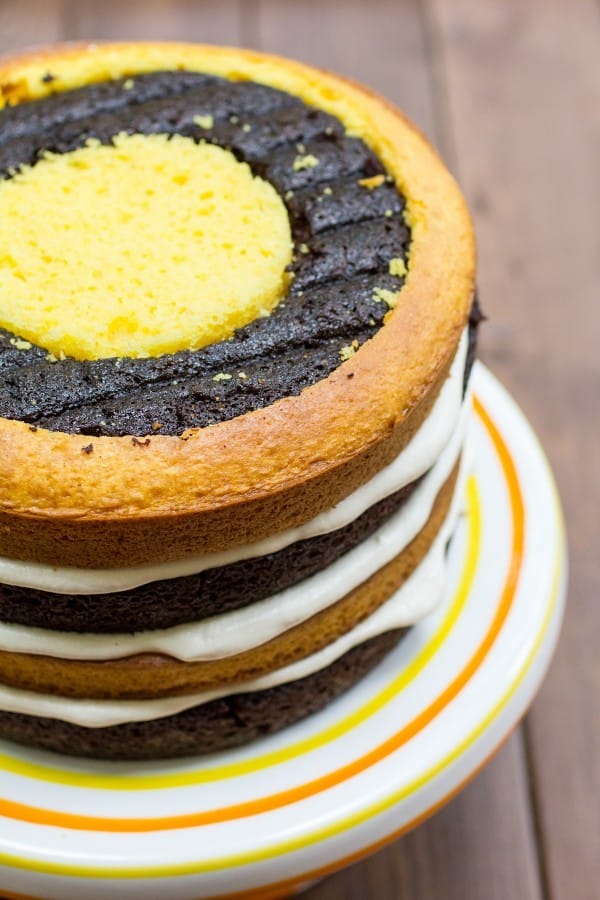

Make sure to put 1/3 of the filling mixture between each layer. It’s okay if it peeks out a bit on the edges.

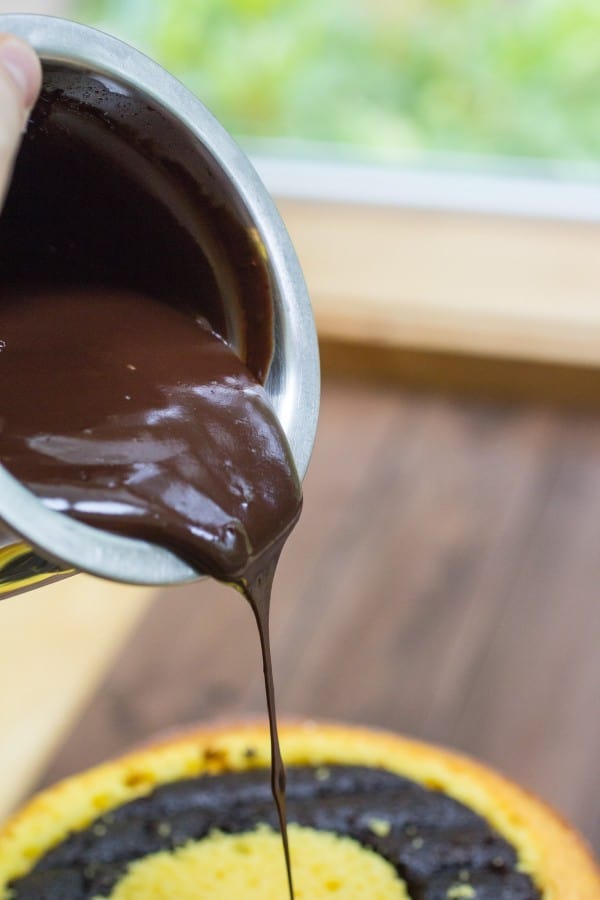
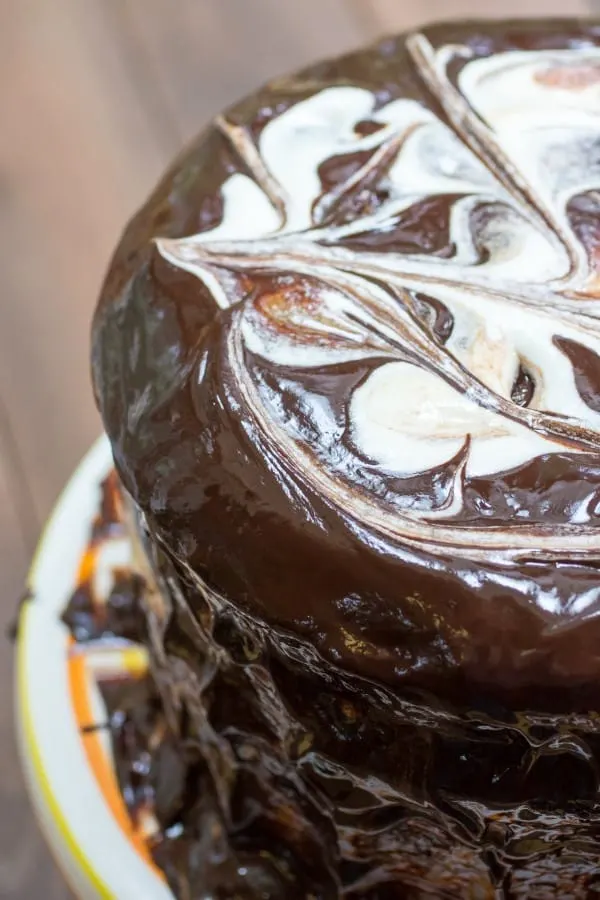
Then whip up your ganache, which is the very easiest thing EVER to make – and pour it all over the top.

Spread it around a bit so it falls down the sides too, and the spread it all around the sides. It’s okay if some of the filling mixes in. It’s a marble cake – after all!
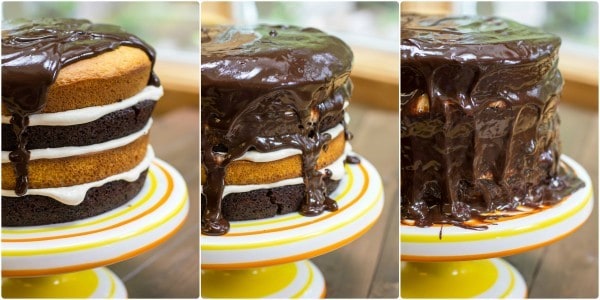

The prep your icing decoration, and put it in small blobs on the top of the cake. Using a butter knife, gently drag it through the chocolate and white icing to create a marbled effect.

Tips for checkerboard cakes
Be careful when cutting and serving.
It can get a little tricky to keep the pattern together. I suspect about 30 minutes in the fridge to firm up the ganache and the filling would’ve helped this – but I cut the cake when it was barely cooled, and we served it without ever being chilled.
That’s how I prefer cake, but by the last two slices, they weren’t very checker-boardy.

If you try it – let me know. You can hashtag #OWYDblog on Twitter or Instagram.
Checkerboard Marble Cake

This unique cake is a marble cake lovers dream! It looks a lot easier than it looks, too. Chocolate and yellow round cake layers combine to make the prettiest cake I've ever served.
Ingredients
Chocolate Cake Layers
- 1 cup cake flour
- 1/2 teaspoon salt
- 1/2 teaspoon baking power
- 1 teaspoon baking soda
- 6 tablespoons cocoa powder
- 1 cup sugar
- 1/2 cup canola oil
- 1/2 cup hot strong coffee
- 1/2 cup whole milk
- 1 large egg
- 1 teaspoon vanilla
Yellow Cake Layers
- 1 boxed yellow cake mix, NO pudding
- 4 large eggs
- 1 cup milk
- 1/2 cup canola oil
Filling
- 1/2 cup butter
- 2 cups powdered sugar
- 2 tablespoons vanilla
- 6 tablespoons heavy cream
- 2 cups marshmallow cream
Ganache
- 2 cups milk chocolate chips
- 1 cup heavy cream
- 2 tablespoons butter
- 1 tablespoons vanilla
Icing
- 4 tablespoons butter
- 1-2 tablespoons milk
- 1 cup powdered sugar
- dash vanilla
Instructions
- Preheat oven to 350 degrees. Prepare 4 - 8 inch cake pans by lightly spraying with baking spray, putting in a circle of parchment on the bottom of the pan, and then lightly spraying again with baking spray.
- Mix chocolate cake batter by combining all ingredients and mixing on medium speed for 2-3 minutes, or until fully combined. Pour into pans, tap pans on counter several times to release bubbles, and bake for 25-30 minutes, or until a toothpick comes out with moist crumbs.
- Mix together yellow cake batter by combining the cake mix, eggs, milk, and oil on medium for 3 minutes. Pour into prepared pans and bake for 25-30 minutes, or until tester comes out with moist crumbs.
- Let all cakes cool completely, and then cut two circles out of each cake, and reassemble in alternating colors.
- While cakes are cooling, mix up the filling by putting all filling ingredients into a mixing bowl and beating on high speed for several minutes, stopping as needed to scrape the sides of the bowl.
- Place 1/3 of the filling mixture between each layer.
- Make ganache by heating the cream, butter, and vanilla until simmering. Pour hot cream over chocolate chips and stir until melted and glossy. Let cool for about 5 minutes, stirring periodically, and then pour over the cake. Spread the ganache evenly over the top and over the sides of the cake.
- Mix icing ingredients together, and place small dollops on the top of the cake. Using a butter knife, gently drag through the chocolate and the blobs to create a marbled pattern on top.
Recommended Products
As an Amazon Associate and member of other affiliate programs, I earn from qualifying purchases.
Nutrition Information:
Yield:
12Serving Size:
1Amount Per Serving: Calories: 1029Total Fat: 55gSaturated Fat: 23gTrans Fat: 1gUnsaturated Fat: 28gCholesterol: 153mgSodium: 720mgCarbohydrates: 125gFiber: 2gSugar: 90gProtein: 10g
Nutrition data provided here is only an estimate. If you are tracking these things for medical purposes please consult an outside, trusted source. Thanks!
Nicole Johnson
Nicole Johnson, a self-taught expert in grilling and outdoor cooking, launched Or Whatever You Do in 2010. Her blog, renowned for its comprehensive and creative outdoor cooking recipes, has garnered a vast audience of millions. Nicole's hands-on experience and passion for grilling shine through her work. Her husband, Jeremiah Johnson, also plays a pivotal role in recipe development, adding his culinary flair to the mix. Together, they form a dynamic duo, offering a rich and varied outdoor cooking experience to their followers.
Checkerboard Marble Cake – Way of The Fork
Tuesday 2nd of May 2017
[…] Checkerboard Marble Cake […]